In this post I would like to spend some time discussing the construction of landscape block planters. These can be built using the smaller size landscape blocks commonly called garden walls. Their sizes usually fall in the area of 4 inches high x 6 inches wide x 12 inches long. They are much lighter and easy to work with than the larger block used as retaining walls
What can we build?
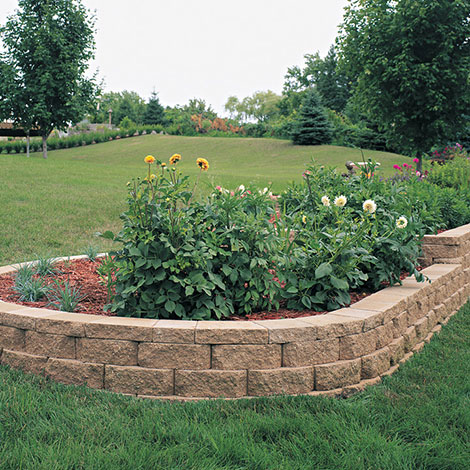
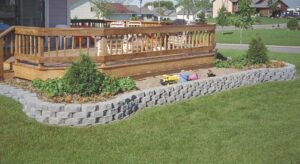
These blocks are used in many instances to create low walled planters of perhaps 3 to 4 courses or layers of block. They typically have a lip on the lower rear face to help 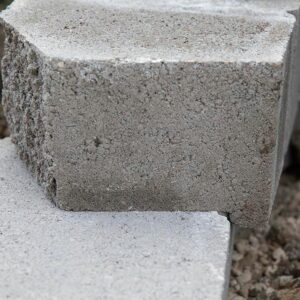 with keeping a uniform batter or slope back. This insures a uniform looking project that will last. They can also be used as a single course structure to create an edging that will separate our planting area from the lawn or patio.
These blocks are usually shorter on the back side than on the front face. This allows for forming curved walls with ease. A straight wall can be easily built as well.
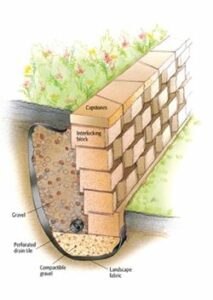
A wall height of two feet is usually the maximum recommendation for these type of landscape blocks. The last course can some times consist of a thinner cap stone for a more finished look. Usually the last course or cap is kept in place by gluing it to the block beneath with landscape block adhesive.
How do we start building Landscape block planters ?
As with most construction projects a good plan at the start will make for a much easier building process. Take the time to measure your site and come up with a simple sketch to help you keep focused on what you are trying to create.
To begin, lay out the site of your project. If your site is fairly flat, it will be a much easier process. For straight wall projects you can use line or string to help position your project. Pound wooden stakes into the ground at each end of the straight wall where you would like the face of your wall to be. Attach string to the stakes by wrapping it around each stake and stretching it out between them. Mark this line with marking paint.
For a curved wall you can lay out a hose to follow your desired wall shape. Keep in mind that a curved block wall will have a minimum achievable radius without having to make cuts. Once you have your desired curved wall shape, mark along the hose with marking paint.
Excavation
The first step in the actual construction is to remove some earth from our site to make room for base material. Following the lines we marked in the previous steps dig 2- 3 inches in front of the marked line and back behind the line to a width of approximately twice that of your landscape block.
A 6-inch wide landscape block should have a trench width of around 12 inches. The depth of the trench should be enough to put at least one inch of the block below the ground with a 4 to 6 inch base of Item 4 or paver base below the block. A wall higher than 1 or 2 courses should have the first course of block mostly buried below ground.
Once you have the trench for your wall excavated it is time to add the Item 4 paver base material. You should place the material in your excavated trench in 1 to 2 inch ” lifts” or layers and than compact well. A simple hand held compactor should work well in this instance.
Build your Wall
If your block have the tab on the bottom for keeping your wall aligned properly you can knock it off with a hammer and chisel on the first course to make leveling a little easier. On a straight wall you can keep things even by using a string line along the back top edge of the block. Use a thin layer stone dust, 1/4 inch or less, underneath the first course to help keep things level.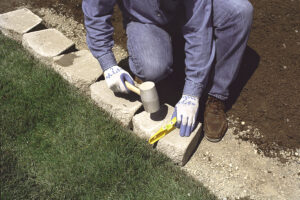
On curved walls just keep making adjustments by eye until you get a result that pleases you. It is important to keep things level in order to create a nice looking project. Batter boards can be placed on either side of your wall and adjusted to level with each other. Batter boards are simply two wood stakes placed about two feet apart with a board attached to them horizontal to the ground.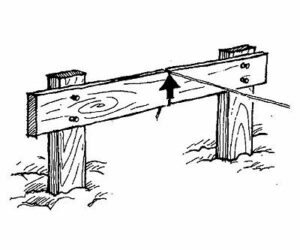
For this project you can level the two horizontal boards with each other with a string level. A string place between the two sets of leveled batter boards can than be used to measure down to the top of your block and keep them level. Once you have the first course installed you will no longer need them. This would be particularly helpful on a sloping grade where the wall courses will be stepping up as you proceed up hill.
As you place one course on top of the layer beneath you will find that you need to cut some block, usually near your corners. This is necessary to keep a running bond or to place the stones so that the stone on top sits equally spaced over the two stones below. The use of a masonry diamond blade will make short work of this cutting.
Drainage and Landscape fabric
In some instances, particularly if your planter is over three courses high, you will want to install 3/4 stone to help drain away water. Start by taking landsape fabric and letting it roll up from the bottom of your trench against the back of your wall and up the excavated bank. Place stone behind the wall and on the fabric being sure to stay about 6 inches beneath the final grade.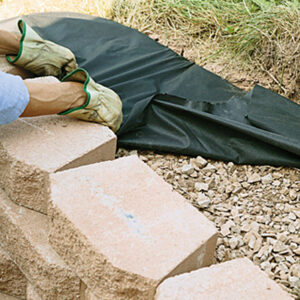
Fold the fabric up over the top of the installed gravel and back to the wall, creating a gravel chamber behind the wall surrounded by the landscape fabric. This will also help to keep dirt from your planter from leaching through the wall. On a higher wall you will want to add the gravel as you proceed.
Install the final course
Your cap stone may be simply the same block as the others. It could als be a special stone for use in creating a more finished appearance. Lay your top stone on the wall and adjust it to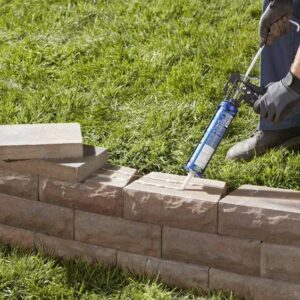 your liking. Once you have it how you like it remove one or two blocks at a time. Place two parallel beads of landcscape block adhesive on the course below the removed cap stones. Than simply reinstall the caps, seating them lightly with a rubber mallet.
Once your cap is in place you can top off your planter with top soil or garden soil and add your plants. For other ideas on the uses of concrete retaining wall blocks click here.
I hope you can find some help in this post in building a planter at your home. Please let me know in the comment section below. Have you have ever attempted a project such as this ? How did it come out ? Do you have any questions ? Ask them there.