
There is one natural material that you may have plenty of, right in your backyard. That material is stone, or rocks as some folks call them. I would like to touch on some procedures for making use of this beautiful material. So let’s see how to build a rock wall.
Rocks
According to your geographic location the availability of different types of stone will vary. If you remember from some of your high school Science classes, there are only a few different types though. Time and place just work together to give each of our specific areas their own beautiful and natural specimens.
For the benefit of not creating too much of a long dull article I am going to focus on the use of fieldstone, which is found almost everywhere. If you have ever noticed one of the many stone walls running around the woods of the Northeast you have seen fieldstone. As farmers prepared their fields for planting they would place the upturned stones on to these walls marking their boundaries.
So fieldstone is just basically stones near the surface of the earth’s soil. There are many stones available especially for building dry rock walls. A visit to your local landscape or mason supplier will probably turn up something you like for this project.
A Dry Rock Wall
The best project for a beginner is to build a simple dry stack stone wall. This is a wall that does not require a complicated foundation. The stones are placed in the wall without using cement or mortar. The project discussed will not be for retaining earth, just a simple two-sided Garden type wall.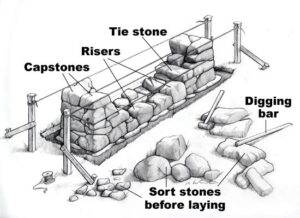
To begin this project you must first remove the topsoil from the area beneath your walls site. You should also remove any small roots and such. This wall will be constructed with methods that allow it to flex and not fall with the earths constant forces being enacted upon it. For this reason we will not need a deep solid foundation.
When your wall is on a hill or slope prepare the base by digging steps in the earth to add stability to the project.
The thickness of your wall should be at least two stones wide so that you can build the two faces of each side neatly. This will usually require a wall of around 18 inches to 2 feet wide, depending on the height of the wall. This wall should not exceed a height of four feet with said two foot width.
The Building Process
Stones that are very round should be avoided as they are very hard to use in this described process of building a wall that will hold together without mortar.
Start off with as many large flat stones as you can, laid horizontally, in what is called a ledge pattern for the base. Stones that have large flat surfaces on the top and bottom will work best for your base stone
The whole idea here is to try to use gravity to our benefit in helping to hold our wall together. The face of each side of the wall should slope in toward the center of the wall from top to bottom. This technique will use gravity to direct the stones movement from gravity, toward the center of the wall and not away from the wall. Occasionally you should place a single tie stone which will span from one side of the wall to the other, “tying ” it together.
Once you have set the base stones of this wall you should try to use your largest stones first in continuing the construction. Place stones so that they stay in place naturally, and leaning inward slightly. You will spend a lot of time searching for the right stones that fit nice and look nice.
During the building of the wall be sure that you are not placing stones so that the top surface is sloping toward the outside of the wall. This will make it difficult to keep the stone placed on top of it from sliding outward over time. When possible, have your placed stone’s top surface sloping inward towards the wall. As you build upward try to have stones from each side touch in the middle or place smaller stones to fill the gaps.
Lay the stones so that they span the vertical cracks between the stones below and avoid long vertical cracks as they will weaken your wall. For this reason try to keep adjoining stones in each layer close to even. It is nearly impossible to find stones that will sit atop one another without some rocking. Wedge stones can and should be used to help keep things moving in the right directions as before mentioned.
During the construction you will often come to a point where you can’t find the right stone to fill a spot. In this case try using two stones or more, instead of one, be it horizontal or vertical.
For a straight wall, I usually like to place 2 or more long wood stakes to represent the final height and vertical slope of my wall face, at each end of my planned wall. A slope of 1/2″ to 3/4″ per foot of height should work well on this type of wall. I then string a line between the stakes, a few inches above where my next layer of stones will be placed. This makes for a good guide in keeping a nice straight wall by just “eyeballing” the placement of each stone with the line.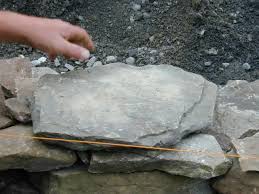
Stand on one end of your wall often and sight along the face to the other end to keep things looking good. Trust your eyes as they are your best straightening tool in this type of build.
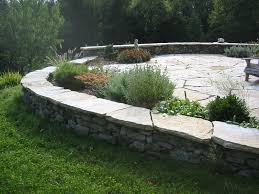
As you near the top of the wall, start to plan for your cap stones. For this purpose, large flat stones will work best. As before finding the right stone for the right place will be difficult. It is good practice to keep your eye out for good-looking cap stones during the build and keep them to the side for later.
The completed wall should stay up and last for many years, if you have followed these procedures. In allowing gravity to work for it, instead of against it, your wall has a leg up on Mother Nature.
Enjoy Your Results
There is nothing quite as satisfying as standing back and admiring the results of your handiwork. Producing a stone wall on your property is something that will give you a sense of accomplishment whenever you walk by it. Besides just getting outside can be beneficial to our health.
I’m sure you will take as much pleasure building it too, if you have decided that this is a project you feel confident in attempting. Please feel free to leave comment or ask any questions you might have below.
Hey Ricky,
What a great post! This is something I could really get into, would make the garden look great, be satisfying, the children would enjoy helping – also adds value to the home. You have explained things very clearly such that this now appears to be something any novice can do.
Are there any rocks you would not recommend using?
I guess with time the rocks may cleave to each other with wear, and wonder whether that also adds to stability?
Thanks again
D
HI D
It would be a great project to get your children involved in. It is also a great way to add to your homes appeal. When selecting stones for such a project, especially for the first time, lean toward flatter, squarer shapes. Stones that are very rounded in shape like river rock are very difficult to build stone walls from. Your local landscape or mason supplier could help you out in this area.
Over time if you build your wall as described in the post allowing gravity to work for you instead of against you your wall will settle in tighter in spots.
Thanks Rick
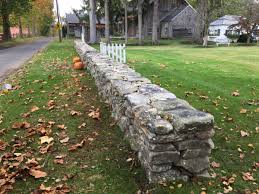
I just loved your article on rock walls. Growing up on the East coast rock walls are common. Here on the West coast, not as much. My question is: can a beginner build a rock wall similar to the one in your photo or is that a project that needs practice on smaller projects first? I appreciate your attention to detail and want to stay a stone project soon!
Hi Anne
Anyone who has been on the East Coast can certainly appreciate a stone walls appeal. The wall pictured is probably a little more advanced than beginner. That being said a lot also depends on your skill set in working on crafts and such. I think any one with a little lust for this type of project can certainly achieve satisfactory results, maybe scaled down a bit on their first attempt.
Thanks Rick
Walls are means of protection and self defense. i would like to build a rock wall with your guide. i have not done this before now but i do think that it will be easy to complete if i just follow the simple guides on your article. thank you very much for this great post. it is helpful.
Hi Kirkman
I’m glad you have discovered some useful information here. I’m sure if you follow the guidance provided you will achieve pleasing results.
Thanks Rick